JinLing's blog


  • Home

  • Archives

  • Search

1.VS Code之常用配置文件

Posted on 2019-01-30 | In 学习笔记

一、配置中文界面

  1. Ctrl + Shift + P

  2. configure display language

  3. 修改文件:local.json

    1
    "local":"zh-CN"
  4. 重启VS Code

二、配置快捷键

  1. 修改文件:keyblindings.json

三、配置debugger

  1. 修改文件:launch.json

四、工作空间配置

在Visual Studio Code里面有两种配置的概念,User和Workspace 。它们分别代表了两种作用域的配置概念。

  • User 全局
  • Workspace 局部 (工作空间)

配置时会生成相应的 settings.json 文件,User的配置文件存放在全局目录中,Workspace的配置文件存放在所在的工作空间

image

五、配置JS文件声明注释

  1. 首选项/用户代码片段

  2. 创建一个.code-snippets文件

  3. 添加自定义片段

    1
    2
    3
    4
    5
    6
    7
    8
    9
    10
    11
    12
    13
       "JS description": {
    "prefix": "jsfile",
    "body": [
    "/**",
    "* @module ${TM_FILENAME_BASE}",
    "* @author: ZHANG Jinling",
    "* @since: ${CURRENT_YEAR}-${CURRENT_MONTH}-${CURRENT_DATE} ${CURRENT_HOUR}:${CURRENT_MINUTE}:${CURRENT_SECOND}",
    "*/",
    "",
    ""
    ],
    "description": "Insert description."
    }
  4. 其具体字段含义


    字段 说明
    prefix 前缀,即你在编辑器中输入的内容为前缀指定内容时,能够在编辑器建议中选择此片段。
    body 具体文本内容,在选择此片段后,会将此数组根据
    \n进行组合输出到编辑器中。

    其中有部分特定的常量,可以获取输入时的部分信息,如:


    ${CURRENT_YEAR}:当前年份,具体字段可以见
    此处

    说明:在写此文章时,部分1.20.0版本增加的常量并不在上面的文档中,具体字段为:
    CURRENT_YEAR:年(4位数)
    CURRENT_YEAR_SHORT:年(2位数)
    CURRENT_MONTH:月
    CURRENT_DATE:日
    CURRENT_HOUR:小时
    CURRENT_MINUTE :分钟
    CURRENT_SECOND:秒
    description 描述说明,在片段说明中会显示此字段的文本内容。


六、其他常用

  1. 添加 git 配置
    1
    2
    3
    {
    "git.path": "D:/Program Files/Git/bin"
    }

CSS知识梳理

Posted on 2018-12-22

🐳 查看完整清晰版:CSS知识梳理思维导图.pdf


CSS知识梳理思维导图 缩略图:

CSS知识梳理思维导图 缩略图

【阮一峰】React入门实例教程(学习笔记)

Posted on 2018-11-05 | In 学习笔记

一、JSX 语法

  1. 支持Html+JavaScript混写。

  2. 允许直接在模板中插入JavaScript变量。如果这个变量是一个数组,则会展开这个数组的所有成员。

  3. 在模板中插入数组变量时,要明确key,react的key关乎到react的dom-diff算法。react中对于dom的操作是根据生成的data-reactid进行绑定的,添加key可以保证dom结构的完整性,而不会根据react自己对dom标记的key进行重新分配。

    1
    2
    3
    4
    5
    6
    7
    8
    9
    10
    11
    12
    13
    let names = ['Alice', 'Emily', 'Kate'];
    let keyid = 0;

    ReactDOM.render(
    <div
    {
    names.map((name) = {
    return <div key = {keyid++}Hello, { name } !</div
    })
    }
    </div,
    document.getElementById('example')
    );

二、组件

  1. React 版本 16 以前:

    1
    2
    3
    4
    5
    6
    # React.createClass() 用于生成一个组件类
    let HelloMessage = React.createClass({
    render: () = {
    return <h1Hello { this.props.name }</h1
    }
    });
  2. React 版本 16 以后:

    1
    2
    3
    4
    5
    6
    7
    8
    9
    10
    11
    class HelloMessage extends React.Component{
    render(){
    return (
    <h1Hello { this.props.name } !</h1
    )
    }
    }
    ReactDOM.render(
    <HelloMessage name="Eva"/,
    document.getElementById("example")
    )
  3. 以上两种的区别:https://www.cnblogs.com/wonyun/p/5930333.html

  4. 所有组件都要有自己的render方法,用于输出组件。

  5. 组件类的第一个字母必须大写,否则会报错。

  6. 组件类只能包含一个顶层标签。

  7. 组件的属性可以在组件类的this.props对象上获取,比如:this.props.name。

  8. 添加组件属性,class属性需要写成className,for属性需要写成htmlFor。这是因为class和for是 JavaScript 的保留字。


三、this.props.children

  1. this.props对象的属性与组件的属性一一对应,但是this.props.children除外

  2. this.props.children表示组件的所有子节点

  3. this.props.children的值有三种可能:

    • undefind —— 没有子节点
    • object —— 只有一个子节点
    • array —— 有多个子节点
  4. 我们可以用 React.Children.map 来遍历子节点


四、PropTypes 组件实例属性验证

  1. 参考

    • segmentfault:https://segmentfault.com/a/1190000016182458
    • 菜鸟教程:http://www.runoob.com/react/react-props.
  2. npm安装

    1
    npm install prop-types --save
  3. CDN引用:

    1
    <script src="https://cdn.bootcss.com/prop-types/15.6.1/prop-types.js"</script>
  4. 常用数据类型检测

    • 字符串类型PropTypes.string
    • 布尔类型PropTypes.bool
    • 函数类型PropTypes.func
    • 数组类型PropTypes.array
    • 数字类型PropTypes.number
    • 对象类型PropTypes.object
    • 元素PropTypes.element
    • 传入任何东西都可以PropTypes.node
    • 选择特定值PropTypes.oneOf([‘是’, ‘否’, “是否”])
    • 选择诸多类型中的一种(任意类型)PropTypes.oneOfType
  5. 实例:PropTypes静态类型校验

    1
    2
    3
    4
    5
    6
    7
    8
    9
    10
    11
    12
    13
    14
    15
    16
    class MyTitle extends React.Component {
    render() {
    return <div{this.props.title}</div;
    }
    }
    MyTitle.propTypes = {
    title: PropTypes.string.isRequired,
    };

    let data = 123;
    ReactDOM.render(
    <MyTitle title={data}/,
    document.getElementById("example")
    )

    // => Warning: Failed prop type: Invalid prop `title` of type `number` supplied to `MyTitle`, expected `string`.
  6. 实例:设置组件属性默认值

    1
    2
    3
    4
    5
    6
    7
    8
    9
    10
    11
    12
    13
    class MyTitle extends React.Component {
    render() {
    return <h1{this.props.title}</h1;
    }
    }
    MyTitle.defaultProps = {
    title: 'defaultTitle',
    };

    ReactDOM.render(
    <MyTitle/,
    document.getElementById("example")
    )

五、ref 属性获取真实的DOM节点

  1. 由于this.refs.[refName]属性获取的是真实的DOM节点,所以必须等到虚拟DOM插入文档后才能使用这个属性
  2. 下面实例中,要保证真实DOM发生在事件之后,才能读取到this.refs.[refName]属性

    1
    2
    3
    4
    5
    6
    7
    8
    9
    10
    11
    12
    13
    14
    15
    16
    17
    18
    class MyComponent extends React.Component{
    handleClick = () = {
    this.refs.myTextInput.focus();
    };
    render = () = {
    return (
    <div
    <input type="text" ref="myTextInput"/
    <input type="button" value="Focus the text input" onClick={this.handleClick}/
    </div
    )
    };
    }

    ReactDOM.render(
    <MyComponent/,
    document.getElementById('example')
    )

六、this.state

  1. 阮一峰教程中使用了getInitialState方法,该方法只能与CreateClass一起使用

  2. 使用React.Component时,需要搭配constructor

  3. this.setState方法不能直接写在constructor中

  4. 只要组件存在constructor,就必须写super,否则this.props将是未定义

  5. 两者的具体区别请对照阮一峰教程和React官方文档

    1
    2
    3
    4
    5
    6
    7
    8
    9
    10
    11
    12
    13
    14
    15
    16
    17
    18
    19
    20
    21
    22
    23
    24
    class LikeButton extends React.Component{
    constructor(props) {
    super(props);
    this.state = { liked: false };
    this.handleClick = this.handleClick.bind(this);
    }
    handleClick(){
    this.setState({
    liked: !this.state.liked
    })
    };
    render(){
    let text = this.state.liked ? 'like' : 'have not liked';
    return (
    <p onClick={this.handleClick}
    You {text} this. Click to toggle.
    </p
    )
    }
    }
    ReactDOM.render(
    <LikeButton/,
    document.getElementById('example')
    )

七、表单

  1. 表单需要用户和组件互动,所以不能用this.props直接读取

  2. textarea 元素、select元素、radio元素都属于这种情况

  3. 要定义一个 onChange 事件的回调函数,通过 event.target.value 读取用户输入的值

    1
    2
    3
    4
    5
    6
    7
    8
    9
    10
    11
    12
    13
    14
    15
    16
    17
    18
    19
    20
    21
    22
    23
    class Input extends React.Component{
    constructor(props){
    super(props);
    this.state = {value: "Hello!"};
    this.handleChange = this.handleChange.bind(this);
    }
    handleChange(event){
    this.setState({ value: event.target.value })
    }
    render(){
    let value = this.state.value;
    return (
    <div
    <input type="text" value={ value } onChange={ this.handleChange }/
    <p{ value }</p
    </div
    )
    }
    }
    ReactDOM.render(
    <Input/,
    document.getElementById("example")
    )

八、组件的生命周期

  1. 三种状态

    • Mounting:已插入真实DOM
    • Updating:正在被重新渲染
    • Unmounting:已移出真实DOM
  2. 五种处理函数

    • componentWillMount():在这个函数中,不可以调用setState来修改状态
    • componentDidMount():①.ajax可以再这里调用,返回数据setState后组件会重新渲染;②.可以通过this.refs来访问真实DOM
    • componentWillUpdate(object nextProps, object nextState)
    • componentDidUpdate(object prevProps, object prevState)
    • componentWillUnmount()
  3. 两种特殊状态

    • componentWillReceiveProps(object nextProps):已加载组件收到新的参数时调用,该函数只监听props的改变,this.setState不会触发这个函数
    • shouldComponentUpdate(object nextProps, object nextState):组件判断是否重新渲染时调用,这个函数只返回true或false,表示组件是否需要更新

    转自https://www.cnblogs.com/qiaojie/p/6135180.html

    1
    2
    3
    4
    5
    6
    7
    8
    9
    10
    11
    12
    13
    14
    15
    16
    17
    18
    19
    20
    21
    22
    23
    24
    25
    26
    27
    28
    29
    class Hello extends React.Component{
    constructor(props){
    super(props);
    this.state = {opacity: 1.0};
    }
    componentDidMount(){
    this.timer = setInterval(function () {
    let opacity = this.state.opacity;
    opacity -= .01;
    if (opacity < 0.1){
    opacity = 1.0
    }
    this.setState({
    opacity: opacity
    })
    }.bind(this), 20)
    }
    render(){
    return (
    <div style={{ opacity: this.state.opacity }}
    Hello { this.props.name }
    </div
    )
    }
    }
    ReactDOM.render(
    <Hello name="world"/,
    document.getElementById('example')
    )

九、Ajax

  1. 我们通常在componentDidMount周期中调用Ajax请求,成功后再用setState方法重新渲染数据
  2. 阮一峰老师的案例中使用的isMouted()方法,在React的ES6语法中已经废弃

    1
    2
    3
    4
    5
    6
    7
    8
    9
    10
    11
    12
    13
    14
    15
    16
    17
    18
    19
    20
    21
    22
    23
    24
    25
    26
    27
    28
    29
    30
    31
    32
    class UserGist extends React.Component{
    constructor(props){
    super(props);
    this.state = {
    username: '',
    lastGistUrl: ''
    }
    }
    componentDidMount(){
    this.serverReq = $.get(this.props.source, function (result) {
    let lastGist = result[1];
    this.setState({
    username: lastGist.owner.login,
    lastGistUrl: lastGist.html_url
    })
    }.bind(this))
    }
    componentWillUnmount() {
    this.serverReq.abort();
    }
    render(){
    return (
    <div
    { this.state.username }'s last gist is <a href={ this.state.lastGistUrl }here</a
    </div
    )
    }
    }
    ReactDOM.render(
    <UserGist source="https://api.github.com/users/octocat/gists"/,
    document.getElementById('example')
    )

    参考文章

    • React入门实例教程 —— 阮一峰
    • React的生命周期到底是怎么一回事?

CSS兼容问题总结整理

Posted on 2018-09-12 | In 经验总结

网页的浏览器兼容性,指网页在各种浏览器上的显示效果尽量保持一致的状态。

兼容性起因

浏览器大战

兼容性的重要性

  • 网站做好了浏览器兼容,能够让网站在不同的浏览器下都正常显示
  • 浏览器兼容能够抓住更多的网站访客
  • 浏览器兼容能够给客户更好的体验

目前常见的兼容方案

  1. IE条件注释法
1
2
3
<!--[if IE]>
这段文字只在IE浏览器显示
<![endif]-->
  1. 类内属性前缀法
字符 示例 说明
_ _color:red; IE6
* *color:green; IE6/7
\9 color:yellow\9; IE6/IE7/IE8/IE9/IE10都生效
\0 color:blue\0; IE8/IE9/IE10都生效
\9\0 color:purple\9\0; 只对IE9/IE10生效
  1. 浏览器前缀法
内核 主要代表的浏览器 前缀
Trident IE浏览器 -ms
Gecko Firefox -moz
Presto Opera -o
Webkit Chrome和Safari -webkit
  1. 通过meta标签来控制

国内浏览器多为双核浏览器(360浏览器等),即webkit+IE,兼容起来实在费神,我们可以使用定义meta标签强制浏览器使用某种内核打开页面:

1
2
3
4
5
6
//若页面需默认用极速核,增加标签:
<meta name="renderer" content="webkit">
//若页面需默认用ie兼容内核,增加标签:
<meta name="renderer" content="ie-comp">
// 若页面需默认用ie标准内核,增加标签:
<meta name="renderer" content="ie-stand">

我在工作中遇到的部分兼容性问题

  1. 浏览器默认margin和padding各有不同

    • reset.css重置全局样式

      1
      2
      3
      4
      {
      margin:0;
      padding:0;
      }
  2. Chrome中文界面下小于12px的文本会强制按照12px显示

    • 可使用CSS属性webkit-text-size-adjust

      1
      { webkit-text-size-adjust:none; }
  1. 漏写DTD声明在IE中会触发浏览器的怪异模式(FireFox中仍会按照标准模式来解析)

    • 一定要加DTD声明
  2. IE和FireFox中相邻DIV上下margin会重合,重合时按照绝对值较大的margin进行展示

    • 养成固定习惯,尽量只用margin-top或者margin-bottom中的一个
  3. 透明度:

    1
    2
    3
    4
    {
    opacity: 0.6 ;
    filter: alpha(opacity=60);
    }
  4. 所有浏览器下,p标签中间加载块元素都会被分解成两个p元素

    • 不要在p标签中间加块级元素
  5. a标签在访问后,各状态的样式会混乱掉

    • 4各伪类的顺序按照:L-V-H-A
  6. 渐变的兼容

    • 使用filter滤镜(带透明度的渐变,在部分低版本浏览器上会失去透明度)

      1
      2
      3
      4
      5
      6
      7
      8
      9
      .gradient{ 
      width:300px;
      height:150px;
      filter:alpha(opacity=100 finishopacity=0 style=1 startx=0,starty=0,finishx=100,finishy=0) progid:DXImageTransform.Microsoft.gradient(startcolorstr=#483F96,endcolorstr=#fff,gradientType=1);
      -ms-filter:alpha(opacity=100 finishopacity=0 style=1 startx=0,starty=0,finishx=100,finishy=0) progid:DXImageTransform.Microsoft.gradient(startcolorstr=#483F96,endcolorstr=#fff,gradientType=1);/*IE8*/
      background:red; /* 一些不支持背景渐变的浏览器 */
      background:-moz-linear-gradient(top, red, rgba(0, 0, 255, 0.5));
      background:-webkit-gradient(linear, 0 0, 0 bottom, from(#ff0000), to(rgba(0, 0, 255, 0.5)));
      }
  1. 360浏览器极速模式和兼容模式下产生的差异

    1
    <meta name="renderer" content="webkit">
  1. a标签使用来绝对定位后,锚点会失效

    • 锚点连接不要使用绝对定位

乱入两条js的

  1. IE下可以用获取常规属性的方法来获取自定义属性,也可以用getAttribute();FireFox中只能使用getAttribute()获取自定义属性

    • 统一使用getAttribute();
  2. IE下,event对象只有x/y属性;FireFox下,只有pageX/pageY属性

    • 使用条件注释语句

      <!--[if It IE 9]>
        <script src="http://cdn.static.runoob.com/libs/html5shiv/3.7/html5shiv.min.js "></script>
      <![end if]-->
      

参考文章

  • 浏览器兼容性-维基百科
  • 史上最全的CSS hack方式一览

媒体查询(@media)

Posted on 2018-08-10 | In 经验总结

媒体查询是可以更精确的作用于不同媒介类型,是实现响应式布局/自适应的一种很好的方法。随着移动端的普及变得越来越重要。

语法
1
2
3
@media mediatype and|not|only (media feature) {
CSS-Code;
}
在使用媒体查询之前,需要设置好<meta>标签:
1
<meta name="viewport" content="width=device-width, initial-scale=1,minmum-scale=1,maxmum-scale=1,user-scalable=no">
Viewport 属性名 备注
width 设置layout viewport 的宽度,为一个正整数,使用字符串”width-device”表示设备宽度
height 设置layout viewport 的高度,这个属性对我们并不重要,很少使用
initial-scale 设置页面的初始缩放值,为一个数字,可以带小数
minimum-scale 允许用户的最小缩放值,为一个数字,可以带小数
maximum-scale 允许用户的最大缩放值,为一个数字,可以带小数
user-scalable 是否允许用户进行缩放,值为”no”或”yes”, no 代表不允许,yes代表允许
- -
target-densitydpi(安卓特有) 值可以为一个数值或 high-dpi 、 medium-dpi、 low-dpi、 device-dpi 这几个字符串中的一个
@media常用方式
  1. 用min-width时,小的放上面大的在下面:

    1
    2
    3
    4
    5
    @media (min-width: 768px){ //>=768的设备 }

    @media (min-width: 992px){ //>=992的设备 }

    @media (min-width: 1200){ //>=1200的设备 }
  2. 用max-width那么就是大的在上面,小的在下面:

    1
    2
    3
    4
    5
    @media (max-width: 1199){ //<=1199的设备 }

    @media (max-width: 991px){ //<=991的设备 }

    @media (max-width: 767px){ //<=768的设备 }
  3. 混合应用:

    1
    2
    3
    4
    5
    6
    7
    8
    9
    @media media screen and (min-width:1200px) {}

    @media media screen and (min-width: 960px) and (max-width: 1199px) {...}

    @media screen and (min-width: 768px) and (max-width: 959px) {...}

    @media only screen and (min-width: 480px) and (max-width: 767px) {...}

    @media only screen and (max-width: 479px) {...}
@media常用媒体尺寸

@media常用媒体尺寸

方案推荐(移动端+PC)
1
2
3
4
5
6
7
8
9
10
11
12
13
14
15
16
@media screen and (min-width: 320px) {html{font-size:50px;}}
@media screen and (min-width: 360px) {html{font-size:56.25px;}}
@media screen and (min-width: 375px) {html{font-size:58.59375px;}}
@media screen and (min-width: 400px) {html{font-size:62.5px;}}
@media screen and (min-width: 414px) {html{font-size:64.6875px;}}
@media screen and (min-width: 440px) {html{font-size:68.75px;}}
@media screen and (min-width: 480px) {html{font-size:75px;}}
@media screen and (min-width: 520px) {html{font-size:81.25px;}}
@media screen and (min-width: 560px) {html{font-size:87.5px;}}
@media screen and (min-width: 600px) {html{font-size:93.75px;}}
@media screen and (min-width: 640px) {html{font-size:100px;}}
@media screen and (min-width: 680px) {html{font-size:106.25px;}}
@media screen and (min-width: 720px) {html{font-size:112.5px;}}
@media screen and (min-width: 760px) {html{font-size:118.75px;}}
@media screen and (min-width: 800px) {html{font-size:125px;}}
@media screen and (min-width: 960px) {html{font-size:150px;}}

参考文章

响应式设计媒体查询尺寸分界点一览表
@media响应式媒介尺寸
@media 最全机型

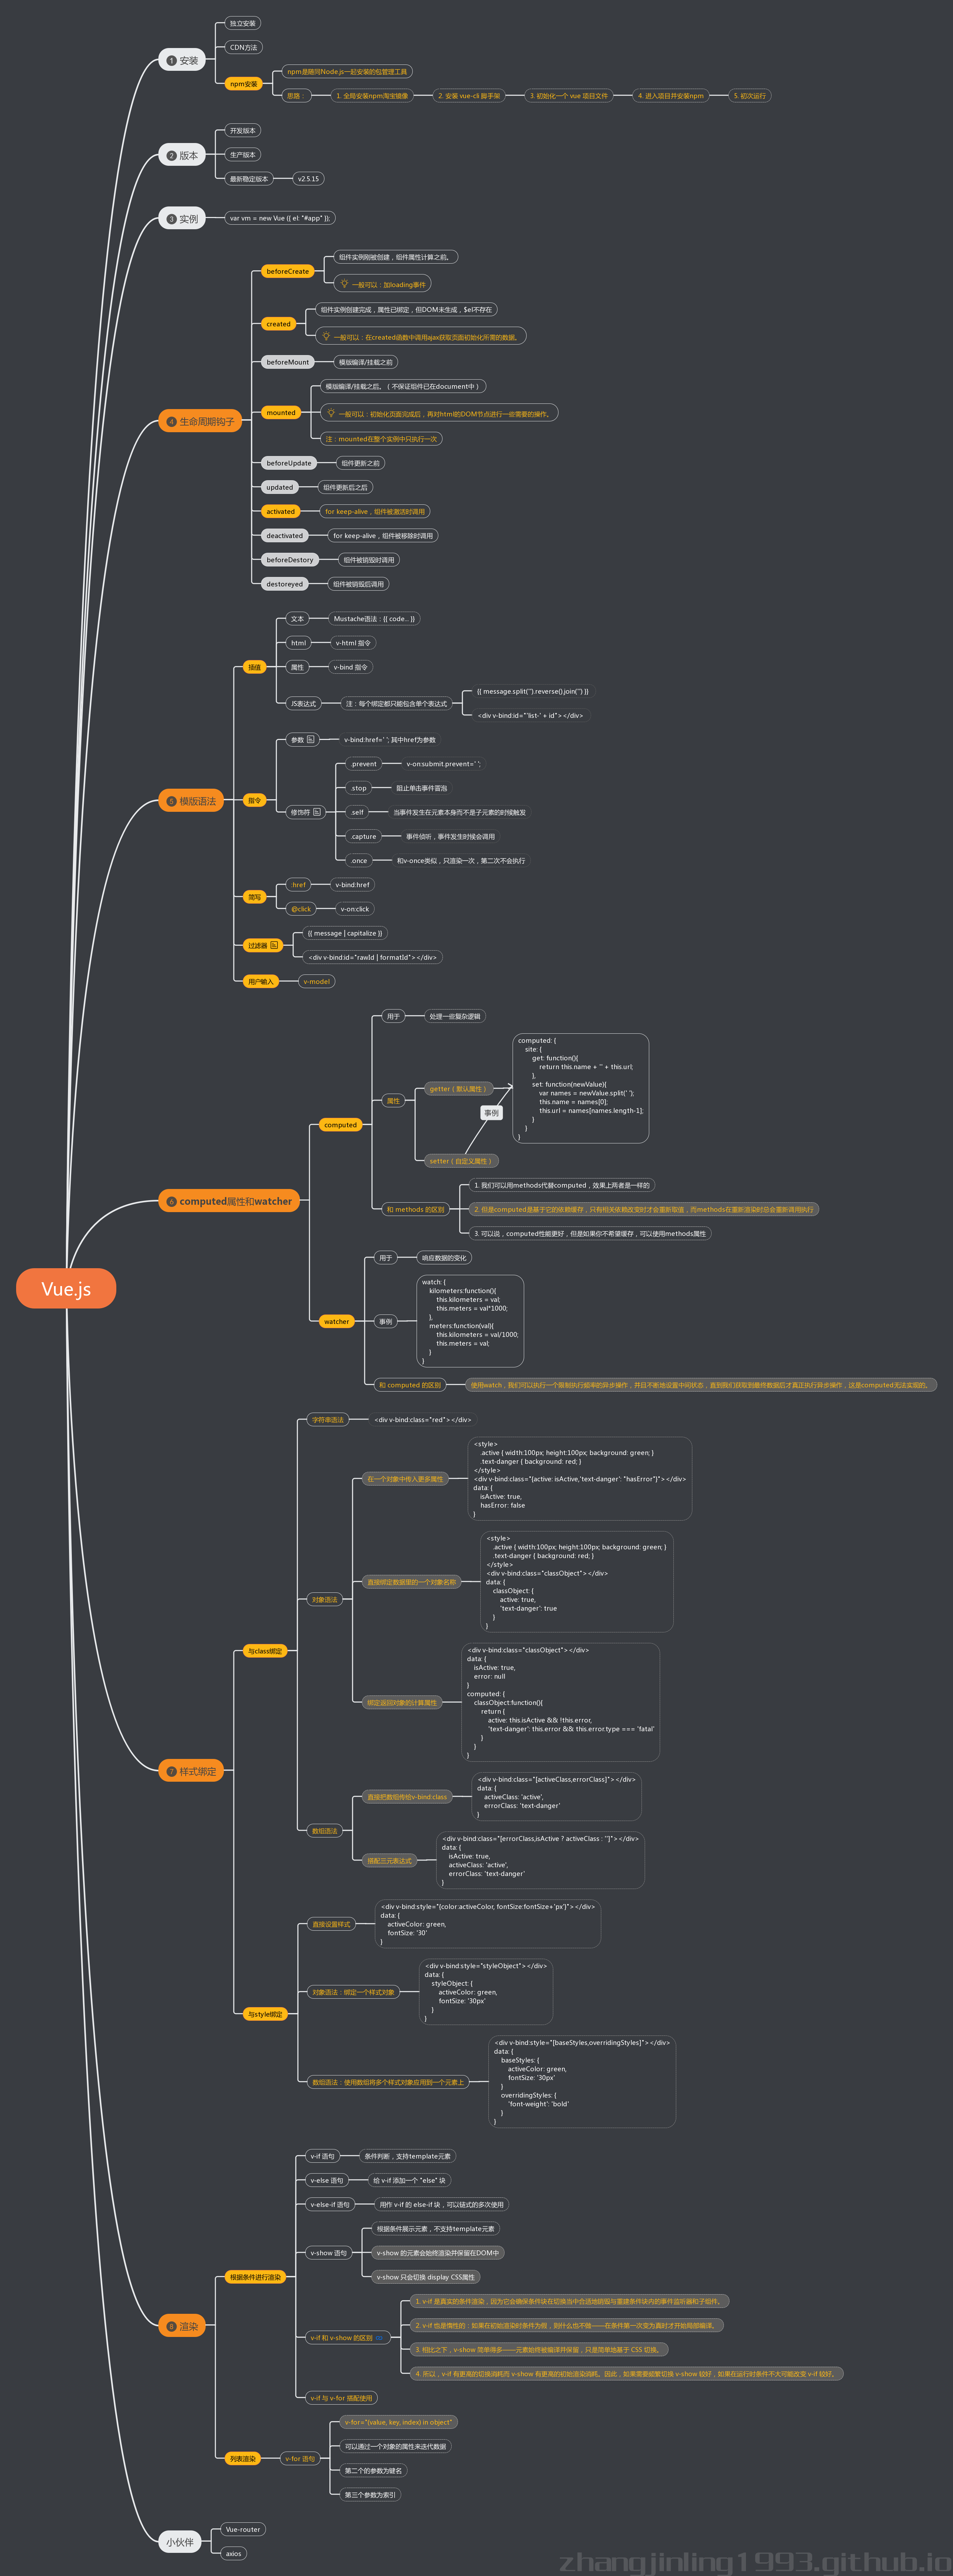
Vue.js 知识梳理

Posted on 2018-08-07

VUe.js 知识梳理 思维导图

前端学习路径——整理自Github Roadmap

Posted on 2018-07-21

前端学习路径——整理自Github Roadmap


参考文章

  • https://github.com/kamranahmedse/developer-roadmap

Hexo + github 搭建个人博客

Posted on 2018-07-14 | In 经验总结

博客搭建过程

前置要求:安装Node.js和Git
  • Node.js 安装配置 | 菜鸟教程
  • Git - 安装 Git
1.在Github上创建一个仓库

在Github上创建一个仓库(New repositor),并开启Github Pages:

创建一个仓库 New repositor

开启Github Pages

创建成功

2.git clone 项目到本地
1
2
3
git clone ...

git remote add origin git@github.com:zhangjinling1993/zhangjinling1993.github.io.git
3.安装Hexo

在本地仓库目录下:

1
2
3
4
5
6
7
8
9
10
npm install hexo-cli -g

// 初始化hexo
hexo init

npm install

// 生成博客页面并启动本地服务器
hexo g
hexo server

创建一篇文章:

1
2
hexo new "文章名称"
hexo new page "页面名称"

hexo new后再执行一次hexo g hexo server

4.使用Hexo deploy部署到Github
  • 首先要安装一个拓展
1
2
3
npm install hexo-deployer-git --save

// 这里安装时出现了问题,可以使用淘宝镜像cnpm重新尝试安装
  • 编辑blog目录下_config.yml文件
1
2
3
4
deploy:
type: git
repo: git@github.com:zhangjinling/zhangjinling1993.github.io
branch: master

注意:这里repo:git@github.com:zhangjinling/zhangjinling1993.github.io的地址要与Github origin地址相符

5.SSH Keys的设置
  • 生成公钥

首先,在Git bash里输入

1
2
3
4
5
6
7
8
9
10
11
12
13
cd ~/.ssh

mkdir key_backup

cp id_rsa* key_backup

rm id_rsa*
// 以上三步为备份和移除原来的SSH key设置

ssh-keygen -t rsa -C "邮件地址@youremail.com"
// 生成新的key文件,邮箱地址填你的Github地址
// Enter file in which to save the key (/Users/your_user_directory/.ssh/id_rsa):<回车就好>
// 接下来会让你输入密码
  • 添加公钥到Github账号中

进入Github首页,账号中心,进入Setting页面

添加SSH公钥

找到系统当前用户目录下C:\Users\用户名\ .ssh id_rsa.pub文件以文本方式打开。打开之后全部复制到key中

注意:用文本打开后,直接全选复制,不要错漏空格等符号

测试是否设置成功

1
ssh -T git@github.com

成功会显示:

1
2
3
4
5
6
7
8
9
10
11
12
13
14
15
16
Your identification has been saved in /c/Users/SC/.ssh/id_rsa.
Your public key has been saved in /c/Users/SC/.ssh/id_rsa.pub.
The key fingerprint is:
SHA256:/CSPEssyw7Cjpe9LOwua/UBarfnS2cIWJFoqdfCZNak 710737179@qq.com
The key's randomart image is:
+---[RSA 2048]----+
| . |
| . + |
| o = . |
| +.E . |
| =++. . S . |
|++ *.. o * |
|+ Oo=++ . o |
|.Oo=*+.. |
|=oBBo. |
+----[SHA256]-----+
  • 设置你的账号信息
1
2
git config --global user.name "zhangjinling1993"
git config --global user.email "710737179@qq.com"

注意:这里是必须设置的,不得忽略,且用户名要与Github上的用户名一致,如果Github没有设置的最好设置一下,这里会将Hexo与Github page联系起来,有可能会影响后面hexo d的结果

  • 执行hexo d
1
2
3
4
5
6
7
8
9
10
INFO  Deploying: git
INFO Clearing .deploy_git folder...
INFO Copying files from public folder...
INFO Copying files from extend dirs...
[master bc70590] Site updated: 2018-07-17 12:42:44
3 files changed, 7 insertions(+), 7 deletions(-)
Branch 'master' set up to track remote branch 'master' from 'git@github.com:zhangjinling1993/zhangjinling1993.github.io.git'.
To github.com:zhangjinling1993/zhangjinling1993.github.io.git
1aa90f4..bc70590 HEAD -> master
INFO Deploy done: git

至此,我们的博客已成功部署到github,打开链接https://***.github.io/就可以看到啦!

6.踩过的坑…

①.git hexo Error: git@github.com: Permission denied (publickey).

1
2
3
4
5
手动删除.deploy_git文件,重新hexo deploy一次

or

重新设置一次公钥

②.fatal: The remote end hung up unexpectedly

1
git config http.postBuffer 524288000

③.MD插入图片

1.首先确认_config.yml 中有 post_asset_folder:true。

2.在hexo的目录下执行安装插件hexo-asset-image,在目录下执行 npm install hexo-asset-image –save

3.安装后重新运行命令 hexo new “”, Hexo会自动建立一个与文章同名的文件夹


参考文章

  • 我是如何利用Github Pages搭建起我的博客,细数一路的坑
  • 手把手教你使用Hexo + Github Pages搭建个人独立博客
  • 使用Hexo+Github一步步搭建属于自己的博客(基础)
  • hexo博客图片问题

Hello World

Posted on 2018-07-13

Welcome to Hexo! This is your very first post. Check documentation for more info. If you get any problems when using Hexo, you can find the answer in troubleshooting or you can ask me on GitHub.

Quick Start

Create a new post

1
$ hexo new "My New Post"

More info: Writing

Run server

1
$ hexo server

More info: Server

Generate static files

1
$ hexo generate

More info: Generating

Deploy to remote sites

1
$ hexo deploy

More info: Deployment

12

Jinling Zhang

我叫金玲,是一名前端技术人员,目前坐标上海,这是我的技术博客,如有问题欢迎指正。🙋联系邮箱710737179@qq.com。

19 posts
2 categories
15 tags
RSS
© 2019 Jinling Zhang
Powered by Hexo
|
Theme — NexT.Muse v5.1.4