draggable 属性是 HTML5 中的新属性,规定元素是否可拖动。
draggable=true 配合 ondrag & ondrop 事件可实现拖拽上传、拖拽删除、图片拖拽排序等等
🌵 拖拽效果简单示例
1 | <div> |
draggable 属性是 HTML5 中的新属性,规定元素是否可拖动。
draggable=true 配合 ondrag & ondrop 事件可实现拖拽上传、拖拽删除、图片拖拽排序等等
1 | <div> |
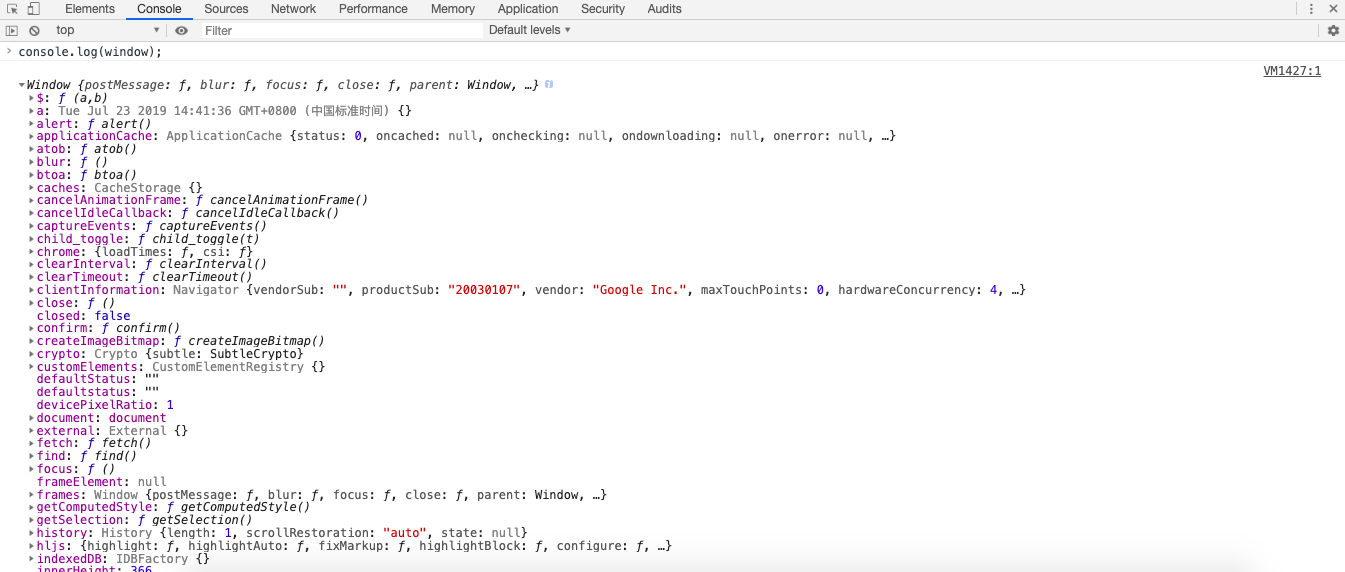
JavaScript 原生中默认是没有 Console 对象,这是宿主对象(也就是游览器)提供的内置对象。 用于访问调试控制台,在不同的浏览器里效果可能不同。Console 对象方法:
打印字符串
1 | console.log('正常输入'); |

打印计算结果
1 | console.log((1+3*23)%8) |

打印变量
1 | var a = new Date(); |

打印对象
1 | console.log(window); |

自定义样式
console.log(“%c + 需要打印的文本”, “CSS样式”)
1 | console.log("%c3D Text"," text-shadow: 0 1px 0 #ccc,0 2px 0 #c9c9c9,0 3px 0 #bbb,0 4px 0 #b9b9b9,0 5px 0 #aaa,0 6px 1px rgba(0,0,0,.1),0 0 5px rgba(0,0,0,.1),0 1px 3px rgba(0,0,0,.3),0 3px 5px rgba(0,0,0,.2),0 5px 10px rgba(0,0,0,.25),0 10px 10px rgba(0,0,0,.2),0 20px 20px rgba(0,0,0,.15);font-size:5em"); |

1
console.info('提示信息');

1
console.warn('警告信息');

1
console.error('错误信息');

1
console.dir(Function);

1
2
3
4
5
6
7
8
9
10
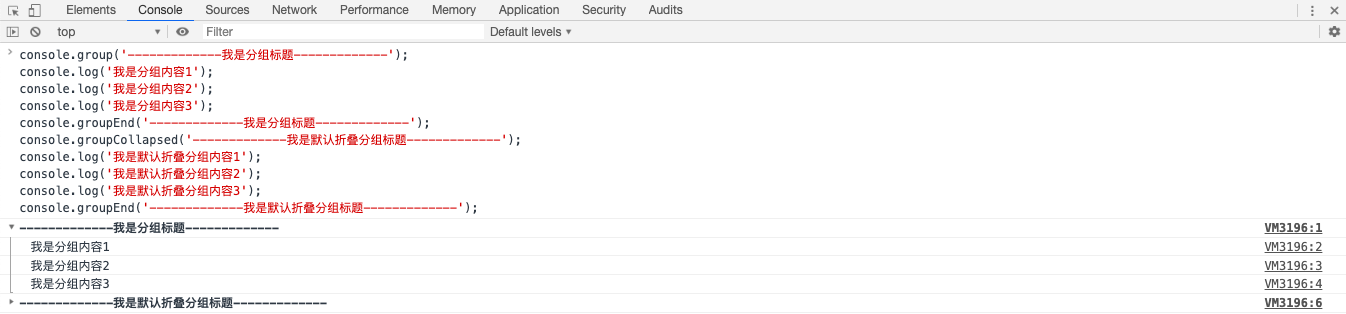
console.group('-------------我是分组标题-------------');
console.log('我是分组内容1');
console.log('我是分组内容2');
console.log('我是分组内容3');
console.groupEnd('-------------我是分组标题-------------');
console.groupCollapsed('-------------我是默认折叠分组标题-------------');
console.log('我是默认折叠分组内容1');
console.log('我是默认折叠分组内容2');
console.log('我是默认折叠分组内容3');
console.groupEnd('-------------我是默认折叠分组标题-------------');
1
2
3
4
5
6
<!--示例粘贴自菜鸟教程-->
var site1 = { name : "Runoob", site : "www.runoob.com" };
var site2 = { name : "Google", site : "www.google.com" };
var site3 = { name : "Taobao", site : "www.taobao.com" };
console.table([site1, site2, site3]);

console.assert(条件, “错误信息”),当条件为false时,控制台将会打印错误信息

1
2
console.assert(true, "不能为false");
console.assert(false, "不能为false");

console.time代表计时开始,console.timeEnd代表即使结束,两者之间是计时程序的过程。

1
2
3
console.time("Chrome中循环1000次的时间");
for(var i = 0; i < 1000; i++){}
console.timeEnd("Chrome中循环1000次的时间");

1
2
3
for (var i = 0; i < 5; i++) {
    console.count('计数');
};

1
2
3
4
5
6
7
8
9
10
11
12
13
14
15
16
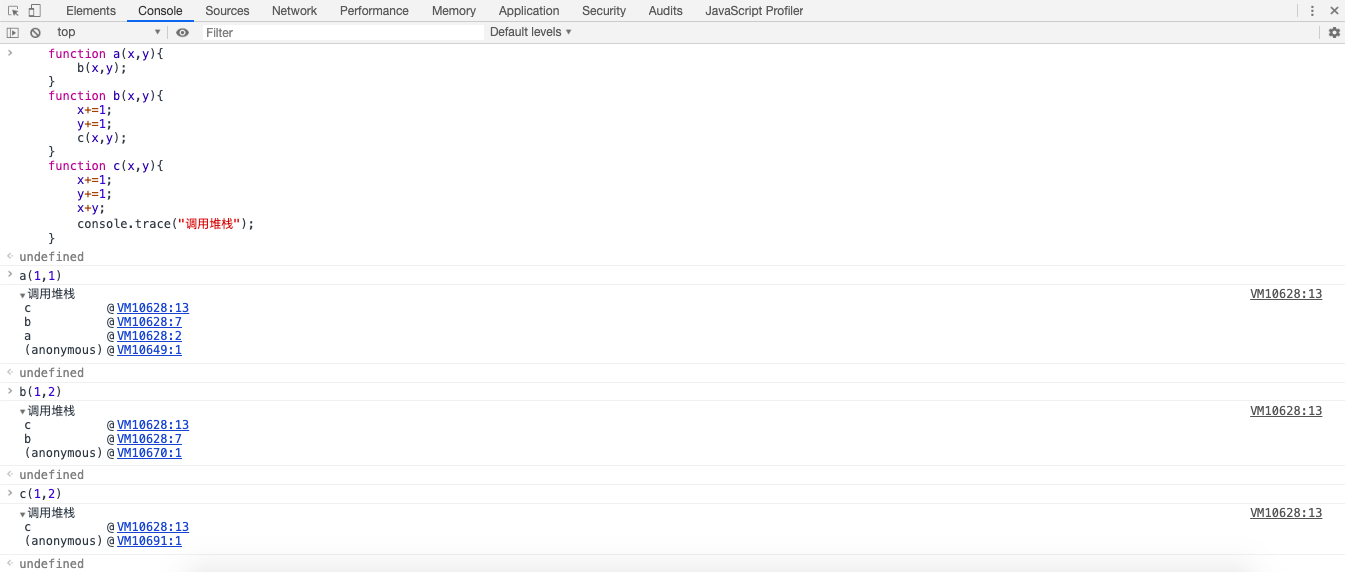
function a(x,y){
b(x,y);
}
function b(x,y){
x+=1;
y+=1;
c(x,y);
}
function c(x,y){
x+=1;
y+=1;
x+y;
console.trace("调用堆栈");
}
a(1,1);
b(1,2);
也许,我们都一样,从未真正的了解过Console… 😿
这个主要是为防止用户一次性发起大量重复请求,前端可以参照以下解决方式:
1️⃣ 在第一次点击后禁用(disabled/readonly)按钮,请求完成后再恢复按钮;
2️⃣ 卸载再重绑按钮事件;
3️⃣ 替换或移除按钮DOM;
4️⃣ Post/Redirect/Get模式。在提交后执行重定向。例如添加一个提交成功的信息页面,目前比较常见且对用户较友好的一种解决方式。
HTML5中新添加了部分语义化标签,这样我们就可以根据网页内容的结构来选择合适的语义标签,不再是千篇一律的<div>和<span>。
这样做可以:
1️⃣ 页面结构清晰,页面在丢失CSS样式时,仍能够清晰的展现 出页面的基本结构。
2️⃣ 代码规范易于维护,在团队开发中更有利。
3️⃣ 便于浏览器解析,有利于SEO。
| 标签 | 语义 |
|---|---|
| <header> | 定义部分区域的页眉(头部) |
| <nav> | 定义含有多个超链接的导航栏区域 |
| <main> | 定义主要内容区域 |
| <section> | 定义某个专题组 |
| <article> | 定义与外层元素有关的文章,可能是论坛帖子、博客、评论… |
| <aside> | 侧边栏 |
| <figure> | 定义独立的流内容(图像、图标、照片、代码等,删除后不会对文档流产生影响) |
| <figcaption> | 置于<figure>元素的第一个或者最后一个元素的位置,用于对figure的内容进行说明 |
| <footer> | 定义部分区域的页脚(底部包含版权数据或者联系方式等) |
| <dialog> | 定义一段对话 |
| <address> | 定义页面或者作者的联系地址 |
| <mark> | 定义标记 |
| … | (待补充部分) |
语义化是在H5中明确的规范,IE8及更早IE版本无法在这些元素中渲染CSS效果,有些工作中可能会涉及到兼容的问题。
目前的解决方案有:
JavaScript添加自定义标签
1 | document.createElement("nav"); |
引入html5shiv.js —— 针对IE浏览器的HTML5 JavaScript补丁,目的是让IE识别并支持HTML5元素
1 | <script src="html5shiv.js"></script> |
本篇记录的是使用CSS3绘制3D立方体,并旋转起来。
我的思路:
1️⃣ 首先,用div元素画6个正方形摞在一起放在画布中间。为了区分,分别给每个div选择了不同的颜色,并且设置为半透明方便透视。
2️⃣ 将6个div元素分为三组(上下一组、左右一组、前后一组),想象以画布中心为圆点,使三组分别沿x/y/z轴旋转90度。
3️⃣ 上下一组,一张向上推50%正方形边长,一张向下推50%正方形边长;左右同理向左右推50%边长,前后同理向前后推50%边长。
4️⃣ 整体旋转展示。
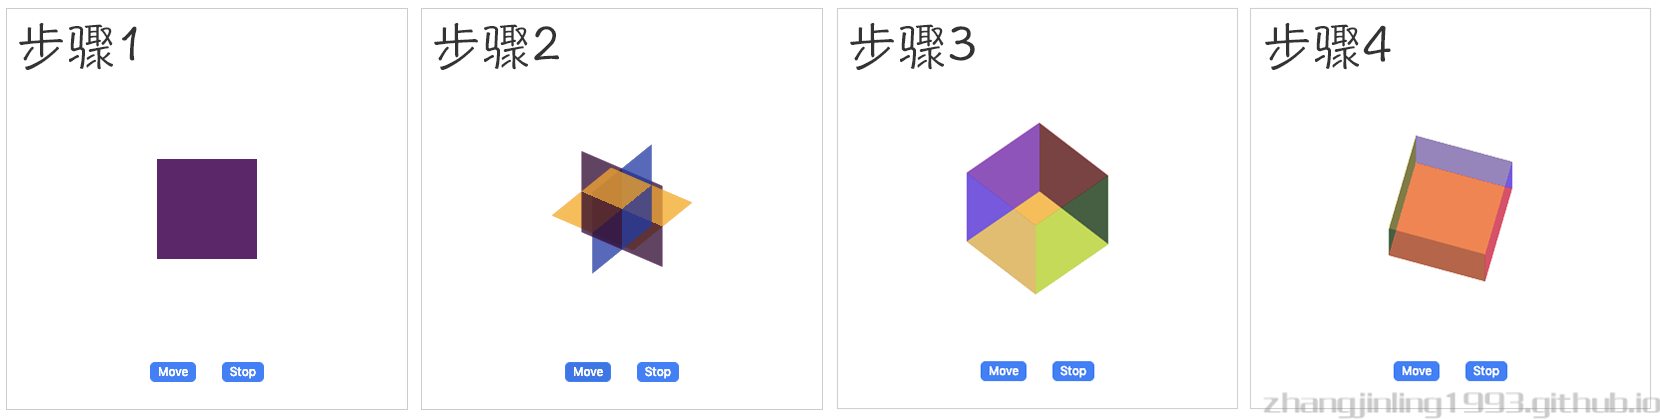
查看效果:Demo效果
※ Html代码&CSS样式布局:1
2
3
4
5
6
7
8
9
10
11
12
13
14
15
16
17
18
19
20
21
22
23
24
25
26
27
28
29
30
31
32
33
34
35
36
37
38
39
40
41
42
43
44
45
46
47
48
49
50
51
52
53
54
55
56
57
58
59
60
61
62
63
64
65
66
67
68
69
70<!DOCTYPE html>
<html lang="en">
<head>
<meta charset="UTF-8">
<title></title>
<style>
.container {
width: 400px;
height: 400px;
border: 1px solid #cccccc;
}
.box {
position: relative;
width: 100px;
height: 100px;
margin: auto;
margin-top: 150px;
transform-style: preserve-3d;
}
.box div {
position: absolute;
top: 0;
left: 0;
width: 100%;
height: 100%;
opacity: .5;
transform-origin: center;
}
.box div:nth-of-type(1) {
background-color: red;
}
.box div:nth-of-type(2) {
background-color: yellow;
}
.box div:nth-of-type(3) {
background-color: green;
}
.box div:nth-of-type(4) {
background-color: blue;
}
.box div:nth-of-type(5) {
background-color: black;
}
.box div:nth-of-type(6) {
background-color: darkmagenta;
}
</style>
</head>
<body>
<div class="container">
<div class="box animate">
<div></div>
<div></div>
<div></div>
<div></div>
<div></div>
<div></div>
</div>
</div>
</body>
</html>
※ CSS3添加6个正方形的动画效果1
2
3
4
5
6
7
8
9
10
11
12
13
14
15
16
17
18
19
20
21
22
23
24
25
26
27
28
29
30
31
32
33
34
35
36
37
38
39
40
41
42
43
44
45
46
47
48
49
50
51
52
53
54
55
56
57
58
59
60
61
62
63
64
65
66
67
68
69
70
71
72
73
74
75
76
77
78
79
80
81
82
83
84
85
86
87
88
89
90
91
92
93
94
95
96
97
98
99
100
101
102
103
104
105
106
107
108
109
110
111
112
113
114
115
116
117.box.animate div {
animation: ease 4s 0s infinite;
}
.box.animate div:nth-of-type(1) {
animation-name: box1-move;
}
.box.animate div:nth-of-type(2) {
animation-name: box2-move;
}
.box.animate div:nth-of-type(3) {
animation-name: box3-move;
}
.box.animate div:nth-of-type(4) {
animation-name: box4-move;
}
.box.animate div:nth-of-type(5) {
animation-name: box5-move;
}
.box.animate div:nth-of-type(6) {
animation-name: box6-move;
}
@keyframes box1-move {
0% {
transform: rotatex(0deg);
}
25% {
transform: rotatex(90deg);
}
50% {
transform: rotatex(90deg) translatez(50px);
}
100% {
transform: rotatex(90deg) translatez(50px);
}
}
@keyframes box2-move {
0% {
transform: rotatex(0deg);
}
25% {
transform: rotatex(90deg);
}
50% {
transform: rotatex(90deg) translatez(-50px);
}
100% {
transform: rotatex(90deg) translatez(-50px);
}
}
@keyframes box3-move {
0% {
transform: rotatex(0deg);
}
25% {
transform: rotatey(90deg);
}
50% {
transform: rotatey(90deg) translatez(50px);
}
100% {
transform: rotatey(90deg) translatez(50px);
}
}
@keyframes box4-move {
0% {
transform: rotatex(0deg);
}
25% {
transform: rotatey(90deg);
}
50% {
transform: rotatey(90deg) translatez(-50px);
}
100% {
transform: rotatey(90deg) translatez(-50px);
}
}
@keyframes box5-move {
0% {
}
25% {
transform: translatez(0px);
}
50% {
transform: translatez(50px);
}
100% {
transform: translatez(50px);
}
}
@keyframes box6-move {
0% {
}
25% {
transform: translatez(0px);
}
50% {
transform: translatez(-50px);
}
100% {
transform: translatez(-50px);
}
}
※ 添加整提旋转动画1
2
3
4
5
6
7
8
9
10
11
12
13
14
15.box.animate {
animation: box-move ease 4s 0s infinite;
}
@keyframes box-move {
0% {
transform: rotatex(0deg) rotatey(0deg)
}
50% {
transform: rotatex(45deg) rotatey(45deg)
}
100% {
transform: rotatex(405deg) rotatey(405deg)
}
}
动画转的我有点头晕🤦♀️,所以我决定把.animate类名剥离出来,用JavaScript通过按钮触发的模式将.animate添加到DOM中去,这样,只有点击按钮后动画才会被触发。最后,我添加了两个按钮,move和stop,分别用来触发动画和使动画停止。1
2
3
4
5
6
7
8
9
10
11
12
13
14
15
16
17
18
19
20
21
22
23
24
25
26
27
28
29
30
31
32
33
34
35
36
37
38
39
40
41
42
43<!-- Html代码 -->
<div class="ope">
<button id="animate">Move</button>
<button id="stop">Stop</button>
</div>
<!-- CSS代码 -->
.ope {
margin-top: 100px;
text-align: center;
}
.ope button {
margin: 0 10px;
border: 1px solid #4380f5;
border-radius: 5px;
cursor: pointer;
background-color: #4380f5;
color: #ffffff;
outline: none;
}
.ope button:hover {
background-color: #3e76e3;
}
.ope button:active {
background-color: #3361ba;
}
<!-- JavaScript代码 -->
<script>
(function () {
var box = document.getElementsByClassName('box')[0];
document.getElementById('animate').onclick = function () {
box.className = 'box animate';
}
document.getElementById('stop').onclick = function () {
box.className = 'box';
}
})();
</script>
安装搜索插件
1 | npm install hexo-generator-searchdb --save |
修改站点配置
1 | # Local_search |
修改主题配置
1 | local_search: |
清除缓存,预览主题效果
1 | hexo clean |
Next主题 配置
1 | Next主题有多种隐藏模式,默认Mist |
新建Tags页面
1 | hexo new page tags |
找到tags文件位置,打开并修改index.md
1 | --- |
修改主题配置
1 | menu: |
将tags: /tags/ || tags前面的#去掉
生成站点地图
安装百度站点地图插件
1 | npm install hexo-generator-baidu-sitemap --save |
修改配置文件(根目录下的_config.yml)
1 | #站点地图 |
查看结果
运行命令 hexo g,进入public目录,发现里面有baidusitemap.xml文件即可
百度站长平台提交网站链接
安装hexo-generator-feed插件
1 | npm install hexo-generator-feed --save |
修改配置文件(根目录下的_config.yml)
1 | #RSS订阅 |
初学Node.js,受《实验楼》启发,写了一个小Demo,功能很简单,主要用来爬取安居客-上海,150-200W之间的房源信息,并将所有结果导出到Excel中去。以下附上源码:
1 | var http = require('https'), |
看完阮一峰的React教程后,就自己做了这个TodoList,自己慢慢琢磨效率差了点但是作为入门小练习还是不错的。
还有就是,emm… React的确比Vue难了一些。
以下是效果图:
我的源码:todolist
UI:bootstrap 4
我在这里主要分了上下两部分,上部分是列表展示,下部分是添加待办,先在src目录下创建一个component文件夹用来存放组件,文件夹中可以先创建两个组件文件list.js和addItem.js。
先假设目前已经添加了部分了部分待办事项,所以我在根组件的state中模拟了一些数据:
1 | lists: [ |
首先要将这些数据从根组件中同步过来,这里传值通过props就可以:
1 | constructor(props) { |
然后渲染到页面中:1
2
3
4
5
6
7
8
9
10
11<ul className="list-group">
{
this.props.lists.map((item, index) => {
return (
<li key={item.id} className="list-group-item">
{item.txt}
</li>
)
})
}
</ul>
这样就完成了最基本的数据展示,但我还需要对这个列表进行一些操作,比如勾选已办或者删除一些某项待办事项,如图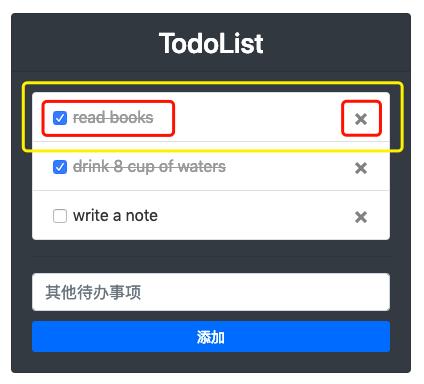
勾选可以用checkbox,Chekbox的勾选状态与代办事项的状态是同步的。删除可以在bootstrap图标里选用一个,所以列表应该是这样的:
1 | render() { |
以上Chekbox和删除按钮上都绑定了一个onClick事件,Checkbox需要切换事项状态,勾选即为已办,未勾选为待办,点击即切换状态:
1 | handleChangeLists = (e, index) => { |
删除按钮只需要做删除数据就可以了:
1 | handleDelete = (index) => { |
到这里,待办列表部分就完成了。
这里也需要先从根组件同步数据。
1 | constructor(props) { |
然后添加待办这里,要有一个Input输入框用来输入待办事项,和一个按钮来完成添加待办的动作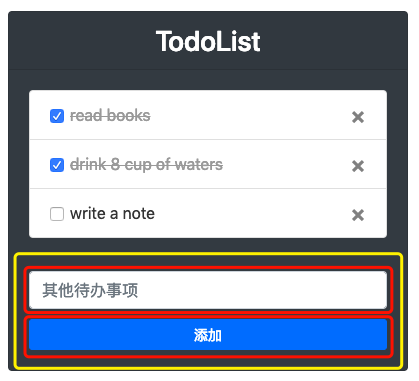
1 | render() { |
添加按钮最主要的动作是要把input框中的value添加到数据lists中,我在handleAddItem()添加了检验,避免添加空的待办项。
1 | handleAddItem = () => { |
handleAddItem函数中,在setState后添加了一个回调函数,回调函数里调用的是父组件的handleFresh事件,主要用来在成功添加事项后同步父组件的数据,使新添加内容及时显示在页面上。
来自父组件的handleFresh():
1 | handleFresh = (obj) => { |
到此我的TodoList就基本完成了,实例虽然小,而且还有很多待完善的地方,但还是很有成就感的 😊
嗯,要多给自己一点鼓励 👏👏👏
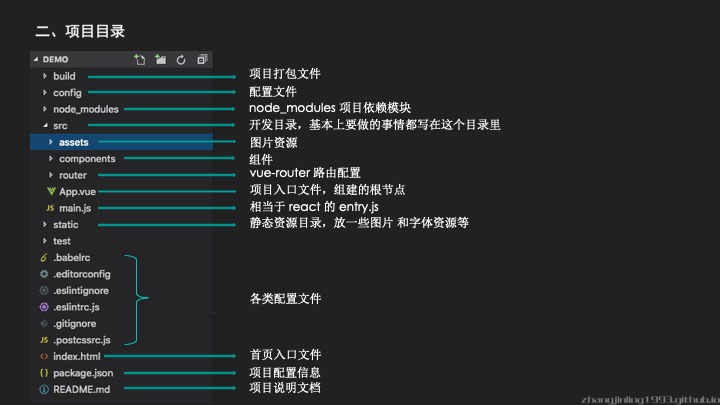
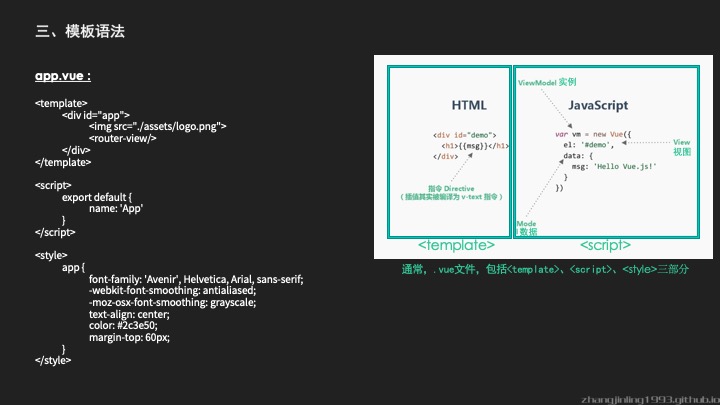
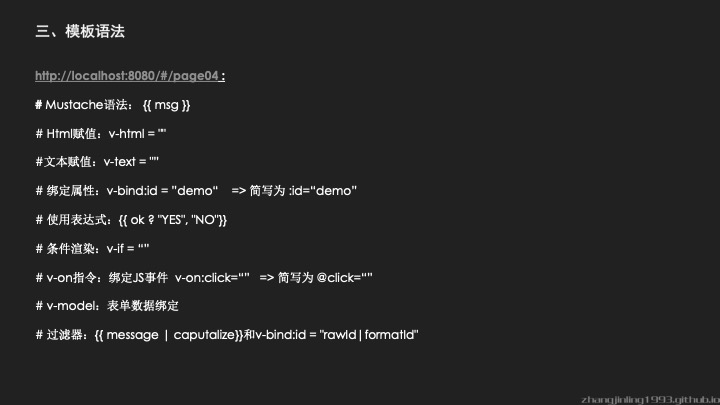
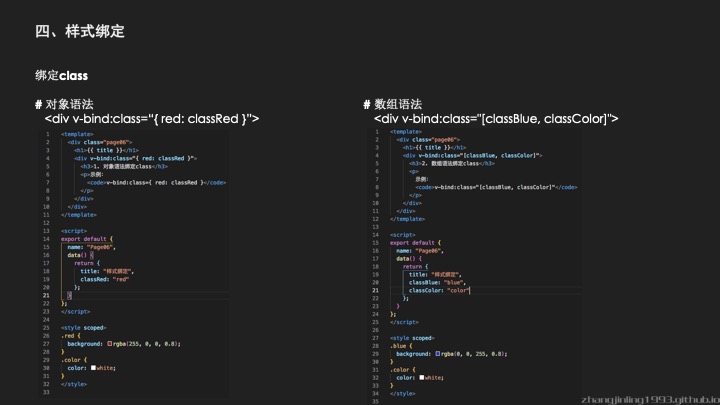
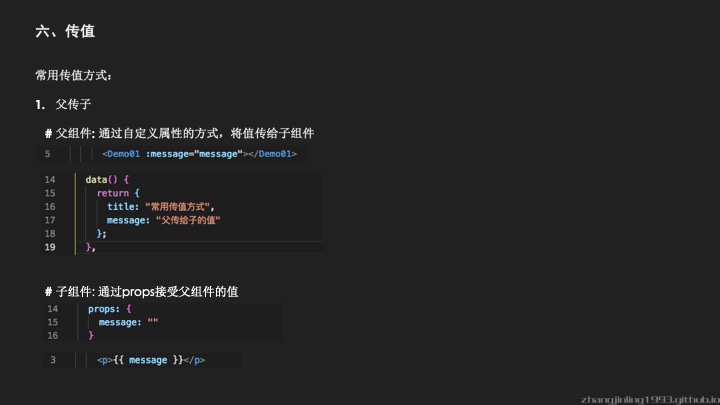
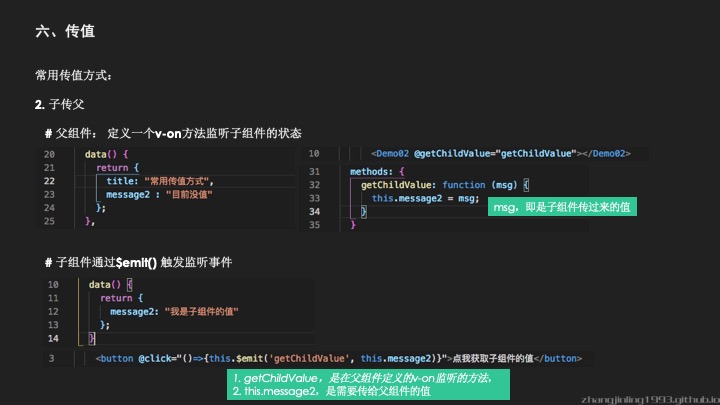
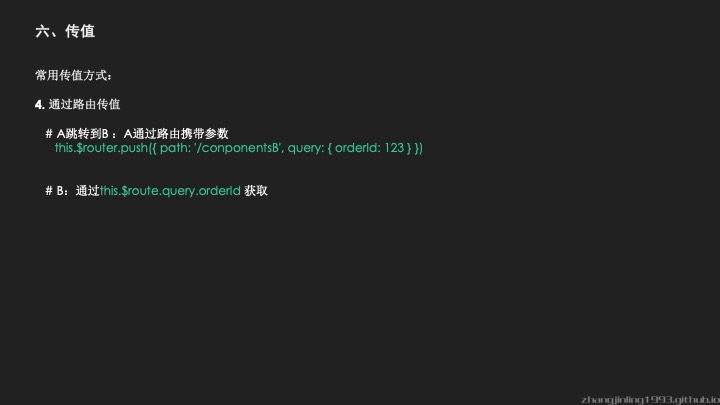
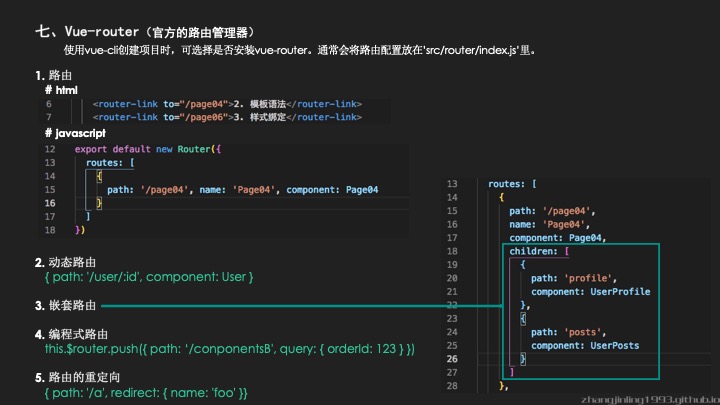
记2019年3月小组内分享内容。
以下是PPT整理内容,附代码Demo一份,我是用PPT结合Demo讲的,写的有点乱,讲的也稚嫩,但重要的是整个整理和分享的过程吧😇
愿往后的每一个我都比这个我更优秀😛


1 | { |